


Introduction
If you’re looking for a solid Town Hall 9 Home Base Layout that protects your resources while keeping your trophies safe, you’ve found the right layout. This hybrid base design gives you the best of both worlds—strong defensive coverage against ground and air attacks, plus smart compartmentalization that makes it tough for attackers to get deep into your base.
Whether you’re climbing the trophy ladder or just want to keep your hard-earned loot safe, this base layout will teach you how proper building placement and strategic wall design can shut down even the most aggressive attacks.
Overall Base Layout Overview
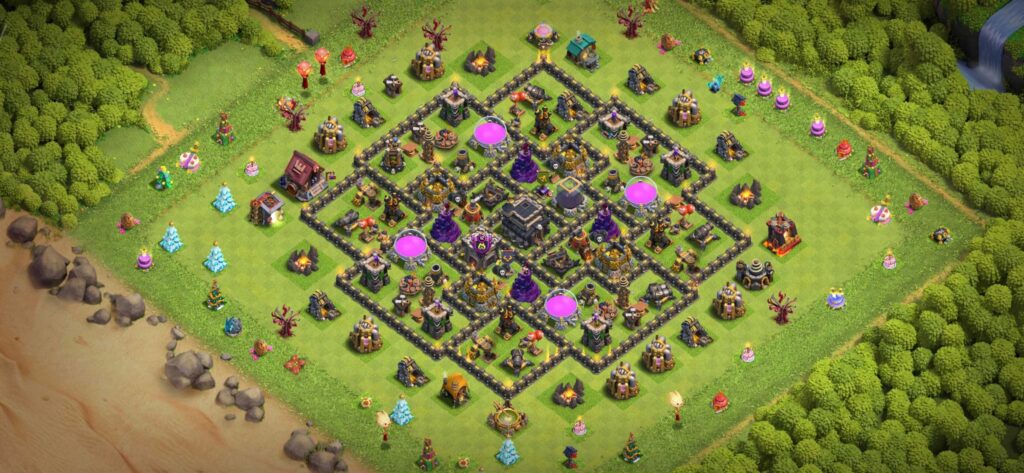
This base features a classic symmetrical design with the Town Hall positioned dead center, surrounded by multiple layers of compartments. The layout uses a square-ish core structure that gradually expands outward, creating distinct defensive zones that force attackers to break through multiple wall layers.
Your base is divided into roughly 15-20 separate compartments, each serving a specific purpose. The core holds your most valuable buildings—Town Hall, Clan Castle, and Dark Elixir Storage—while the middle ring contains your main defenses. The outer ring mixes defensive buildings with resource collectors, creating a buffer zone that slows down enemy troops.
The beauty of this design is how it controls troop movement. Attackers can’t just funnel straight to the center. They’ll have to zigzag through compartments, getting hammered by overlapping defensive fire the entire way. The compartments also prevent Wall Breakers from opening up large sections of your base with one or two blasts.
Defensive Building Placement
Your X-Bows are positioned near the core, slightly offset from the absolute center. This placement is brilliant because X-Bows have excellent range and can cover almost the entire base from this position. They’re set up to target both ground and air units, giving you flexibility against different attack strategies.
The Air Defenses are spread out in a triangular pattern around the core. This is crucial for stopping mass Dragon or LavaLoon attacks. No matter which side attackers come from, at least two Air Defenses will be hitting their air troops immediately. The spacing also prevents Lightning Spells from taking out multiple Air Defenses at once.
Your Wizard Towers sit in the middle defensive ring, positioned where they can splash damage across multiple compartments. These towers are your MVP against Hog Riders, Valkyries, and clustered ground troops. The placement ensures that enemy troops get cooked no matter which path they take.
Archer Towers and Cannons form your outer defensive perimeter. They’re evenly distributed around the base, creating a continuous ring of fire that chips away at enemy troops from the moment they enter your base. The Archer Towers specifically cover both ground and air, while Cannons focus on ground threats approaching from any angle.
Your defensive buildings cover each other beautifully. If attackers try to pick off one defense, at least 2-3 other defensive structures will be shooting at their troops. This overlapping coverage is what makes the base so hard to crack.
Resource & Key Building Protection
The Town Hall sits in the absolute center, making it the hardest building to reach. This is perfect for trophy pushing because attackers will struggle to get that two-star. Even if they break into the core, they’ll have burned through most of their troops and time.
Your Clan Castle is also centrally located, just slightly offset from the Town Hall. This means defending troops (like Wizards, Valkyries, or a Dragon) will pop out right when attackers reach the core, causing maximum chaos. Smart attackers will need to lure these troops out first, wasting time and resources.
The Dark Elixir Storage is protected deep within the core compartments. Since Dark Elixir is the most valuable resource at Town Hall 9, this placement ensures attackers need a strong, well-planned attack to reach it. Casual raids won’t touch your DE.
Your Gold and Elixir Storages are spread between the core and middle rings. Some are inside the compartments near the center, while others are positioned in the outer defensive zones. This split storage placement is smart—even if attackers get to some storages, they won’t be able to grab all your loot in one attack.
Resource collectors (Gold Mines and Elixir Collectors) are positioned around the outer ring. These act as bait structures. Many casual attackers will settle for sniping these external buildings for a quick 30-40% one-star, leaving your core untouched. It’s a sacrifice that keeps your main storages and trophies safe.
Trap Placement Strategy
Based on the compartment structure and open spaces visible in this base, you’ll want to place traps in high-traffic funneling zones. Look at the gaps between compartments—these are natural pathing lanes where troops will travel.
Spring Traps should go in spaces where Hog Riders, Giants, or Golems will path through. Position them right in front of defensive buildings inside compartments. When troops cross these tiles while moving toward a defense, they’ll get bounced out of the attack.
Giant Bombs are your secret weapon against Hog Rider attacks. Place them in pairs (Double Giant Bomb or DGB spots) in compartments that Hogs will naturally path through. The empty tiles between your Wizard Towers and the core are perfect DGB locations. When Hogs trigger both bombs simultaneously, the entire group gets wiped out.
Air Bombs and Seeking Air Mines should be scattered around your Air Defenses and in the core area. Position them where Balloons, Dragons, and Lava Pups will fly over. The element of surprise is key—attackers won’t expect traps until it’s too late.
Small Bombs work great near resource buildings and at the outer edges. They’ll chip away at Wall Breakers trying to open compartments, or clean up low-health Archers and Goblins going for collectors.
The key is hiding traps in unexpected spots. Don’t make it obvious. Use the compartment walls and building placement to disguise where traps are likely located.
Troop Pathing & Attack Behavior
When ground troops attack this base, they’ll naturally spread out around the outer ring, targeting those resource collectors and outer defenses first. Giants and Golems will tank damage while moving inward, but the compartment walls force them to take longer paths.
Wall Breakers become critical for attackers. They’ll need to blow through 3-4 wall layers to reach the core. Each broken compartment slows the attack down and gives your defenses more time to eliminate troops. If Wall Breakers get picked off by Mortars or Small Bombs, the attack stalls completely.
Hog Rider attacks will struggle because of the compartment design. Hogs jump walls easily, but they’ll path in predictable patterns around defenses. That’s where your Giant Bomb placements come in. If attackers don’t pre-scout or heal at the right moment, their Hog army gets destroyed.
For air attacks, Dragons and Balloons will typically come from one side and sweep across the base. Your spread-out Air Defenses make this tough. They’ll need to funnel carefully to avoid facing all three Air Defenses at once. Clan Castle troops and Air Bombs in the core provide additional surprise defense.
Valkyrie-based attacks can cause problems because Valks love these tight compartments. However, the compartment walls slow their spin-to-win movement, and your splash defenses (Wizard Towers and Mortars) shred them if they cluster.
The base forces attackers to commit heavy troops and spells just to break into the core. By the time they reach your Town Hall or Dark Elixir Storage, they’re usually low on troops and time.
Best Use Case for This Base
This base shines as a hybrid layout. It’s designed to protect your trophies while keeping your resources reasonably safe. Here’s when you should use it:
Trophy Pushing: Absolutely. The centered Town Hall makes getting two stars very difficult. Most attackers will settle for a one-star 40-50% destruction, which won’t hurt your trophy count much.
Farming: Pretty good. Your storages are well-protected, and the outer collectors act as sacrificial bait. You’ll lose some collector loot but keep your storage reserves safe.
Clan Wars: Decent, but not optimal. While the base has strong defensive fundamentals, war bases typically benefit from different configurations (like off-center Town Halls to prevent two-stars). You can use this in war, but consider tweaking it or using a dedicated war base for serious wars.
Casual/Daily Play: Perfect. If you’re just playing regularly, collecting resources, and doing friendly challenges, this base handles 90% of attacks you’ll face.
Copy This Base and Start Defending
This Town Hall 9 hybrid base gives you solid all-around protection without major weaknesses. The symmetrical design looks clean, the compartments control troop pathing, and the defensive coverage makes attackers work hard for every percentage point.
Copy this base layout and test it yourself. Pay attention to your defense logs and see where attackers struggle most. You might want to adjust trap placements based on the attack strategies you face most often.
Remember: no base is perfect, but a well-designed layout like this makes you a much harder target than 80% of Town Hall 9 players out there.
FAQ Section
Q1: Is this base good against Hog Riders?
Yes, this base handles Hog Riders well thanks to the compartment design. If you place Giant Bombs correctly in the pathing lanes between compartments, you can wipe out large groups of Hogs. The scattered defenses also force Hogs to travel longer distances, giving your bombs and splash defenses more time to work.
Q2: Can this base defend against air attacks like Dragons or LavaLoon?
The base has solid air defense thanks to spread-out Air Defenses and centralized Wizard Towers. However, strong air attacks with proper funneling and Rage Spells can still break through. Make sure your Clan Castle has anti-air troops (Dragon, Witch, or Baby Dragon) to increase your air defense.
Q3: Should I use this base for Clan Wars?
You can, but it’s better suited for trophy pushing and farming. For serious Clan Wars, consider using a dedicated war base with an off-center Town Hall to make two-stars harder. This base will still perform decently in wars, just not as optimally as a purpose-built war layout.
Q4: Where should I place my Giant Bombs?
Place Giant Bombs in pairs (Double Giant Bomb spots) in compartments between your core and middle defensive ring. Focus on areas where Hog Riders will naturally path when targeting defenses. The spaces near Wizard Towers and between Air Defenses are ideal DGB locations.
Q5: Why are resource collectors placed outside the walls?
This is intentional bait strategy. Collectors outside the walls attract casual raiders who just want quick loot. They’ll grab 30-40% destruction and leave without touching your storages or core. It’s a trade-off that protects your main resources and trophies.
Q6: How often should I change my base layout?
If you’re getting consistently three-starred, it’s time for a change. Otherwise, keep this layout and just adjust trap placements every few weeks based on the attack strategies you’re facing. Variety keeps attackers guessing and prevents them from learning your trap locations.
Ready to defend like a pro? Copy this base and watch attackers struggle to break through your defenses!
If you want to see the speeds built on the base, you can watch the video I’ve uploaded on my YouTube channel. You can watch it here, just click on the button below:-
Thanks, guys for visiting this site. If you want to copy this base layout to your game, by click the following button.
